# NixOS on WSL2: a short admin runbook, and the files WSL manages instead of NixOS
[NixOS-WSL](https://github.com/nix-community/NixOS-WSL) runs a full NixOS inside WSL2, with systemd, `nixos-rebuild` and generations included. Everything in [the first-steps entry](first-steps-configuration-generations-rollback.md) still applies. What changes is that WSL owns a few files NixOS normally manages. This runbook checks install, configuration and recovery against the project's own docs and module source (release `2605.7.2`, which tracks NixOS 26.05).
## Prerequisites
- **WSL from the Microsoft Store.** The [install docs](https://nix-community.github.io/NixOS-WSL/install.html) say it's "tested with the Windows Store version of WSL 2", and support for older inbox versions is "best-effort". Check with `wsl --version`. If that command doesn't work, the troubleshooting docs say you're "probably not using the Microsoft Store version". Update with `wsl --update`. On a machine with no WSL at all, `wsl --install --no-distribution` installs WSL without the default Ubuntu ([Microsoft's command reference](https://learn.microsoft.com/en-us/windows/wsl/basic-commands#install)), so NixOS is the only distro.
- **WSL 2.4.4 or later** for the one-step `.wsl` install. Older versions use `wsl --import` instead.
- **Systemd is not something you enable yourself.** On other distros you add `[boot] systemd=true` to `/etc/wsl.conf`. Here, `/etc/wsl.conf` is generated from the `wsl.wslConf` option, and `wsl.wslConf.boot.systemd` defaults to `true`. The module warns that turning it off "is strongly discouraged and WILL break things". The old workaround for WSL builds without systemd is gone. `wsl.nativeSystemd` is now a removed option whose message reads *"Native systemd is now always enabled as support for syschdemd has been removed"*, so you need a WSL build that supports systemd natively.
## Install
Download `nixos.wsl` from the [latest release](https://github.com/nix-community/NixOS-WSL/releases/latest). Releases before 2411 called it `nixos-wsl.tar.gz`. Then, in PowerShell:
| WSL version | Command |
|---|---|
| 2.4.4 or later | `wsl --install --from-file nixos.wsl` (or double-click the file). Use `--name` and `--location` to change the defaults. |
| Older | `wsl --import NixOS $env:USERPROFILE\NixOS nixos.wsl --version 2` |
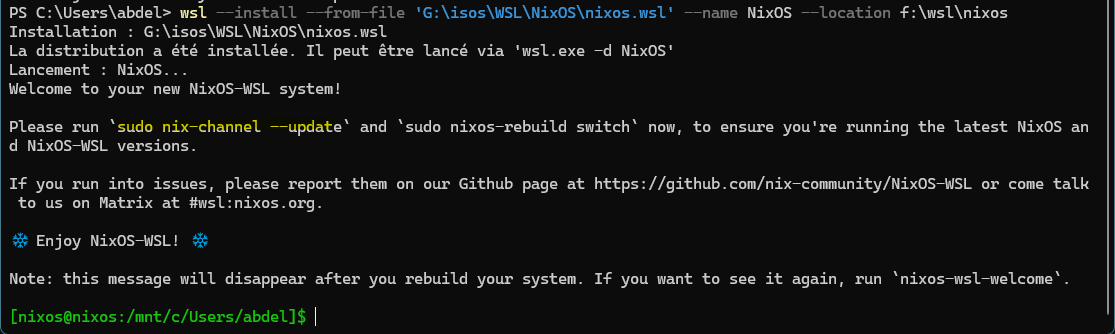
On WSL 2.4.4 and later, the install starts the distro immediately and prints the NixOS-WSL welcome banner:
Installing from nixos.wsl with a custom --name and --location. The first shell opens in the Windows directory the command was run from, under /mnt/c. Select the image for full size.
The banner asks for two commands, not just the channel update the install docs mention. Run both, and set a password first:
```sh
passwd # user "nixos", in wheel; sudo asks for a password by default
sudo nix-channel --update # needed once before the first nixos-rebuild
sudo nixos-rebuild switch # picks up the latest NixOS and NixOS-WSL; also removes the banner
```
Expect that first `switch` to take a while. It downloads everything the configuration describes, and the later ones only fetch what changed.
The banner only comes from the configuration baked into the tarball, which is used until the first `nixos-rebuild`. After that, `nixos-wsl-welcome` shows it again on demand. Later, start the distro with `wsl -d NixOS`.
Make it the default distro with `wsl -s NixOS`.
## Configuration
### Keep the configuration outside the distro
`/etc/nixos/configuration.nix` lives in the distro's virtual disk. For `wsl --unregister`, Microsoft warns that "all data, settings, and software associated with that distribution will be permanently lost", and that includes the only description of your system. Put the configuration in a Git repository with a remote from day one. Git isn't installed yet, but `nix-shell -p git` provides it for the session until the configuration adds it for good.
The push is what protects you, not where the clone lives. A clone under `/mnt/c` would also survive an unregister, but Linux tools read Windows files over 9P, and [Microsoft's file-system guidance](https://learn.microsoft.com/en-us/windows/wsl/filesystems) is to keep them in the Linux file system "for the fastest performance speed". So keep the clone in your home directory.
### Channels or flakes
The installed `/etc/nixos/configuration.nix` imports ``. The installer adds a `nixos-wsl` channel next to the usual `nixos` one, so `sudo nix-channel --update` updates both. That setup is fine to keep.
To switch to flakes, follow the [project's flakes how-to](https://nix-community.github.io/NixOS-WSL/how-to/nix-flakes.html): add a `nixos-wsl` input and put `nixos-wsl.nixosModules.default` in your module list with `wsl.enable = true`. Things to watch:
- Flakes are still experimental. Enable them first with `nix.settings.experimental-features = [ "nix-command" "flakes" ];` and a normal `sudo nixos-rebuild switch`.
- Remove the `` import when you move to flakes, so the module isn't loaded twice from two sources.
- NixOS-WSL's own flake pins `nixos-unstable`. Add `nixos-wsl.inputs.nixpkgs.follows = "nixpkgs";` so your lock file holds one nixpkgs, the one you chose, not two.
- The how-to's example sets `system.stateVersion = "25.05"`. Don't copy that line. Keep whatever your install wrote, [for the reasons here](first-steps-configuration-generations-rollback.md).
- A flake in a Git repo only sees files Git knows about. The [Nix manual](https://nix.dev/manual/nix/2.34/command-ref/new-cli/nix3-flake.html) says local files are used "as long as they have been added to the Git repository". A new module you forgot to `git add` fails the build as if it didn't exist. A commit isn't required: uncommitted changes only earn a "dirty" warning.
Then rebuild from the repository, naming the configuration from `nixosConfigurations`:
```sh
sudo nixos-rebuild switch --flake .#nixos
```
### Interop with Windows
Four switches control how Windows binaries and PATH leak into NixOS. All are verified in the module source:
| Option | Default | What it does |
|---|---|---|
| `wsl.wslConf.interop.enabled` | `true` | Allows running `.exe` files from the Linux shell |
| `wsl.wslConf.interop.appendWindowsPath` | `true` | Tells WSL to add the Windows PATH to `$PATH` |
| `wsl.interop.includePath` | `true` | "Include Windows PATH in WSL PATH", applied by NixOS-WSL's shell init |
| `wsl.interop.register` | `false` | Re-registers the binfmt handler for Windows executables |
The last one is the trap. If you add *any* `binfmt` registration, for example `boot.binfmt.emulatedSystems = [ "aarch64-linux" ]` to build ARM images, the module warns that doing so "without re-registering WSLInterop (`wsl.interop.register`) will break running .exe files from WSL2". Set `wsl.interop.register = true` alongside it.
### GPU acceleration
The module already sets `hardware.graphics.enable = true`. To use the Windows host's GPU driver, add:
```nix
wsl.useWindowsDriver = true;
```
That links the host libraries from `/usr/lib/wsl/lib` into a package NixOS can use. The generic WSL approach, `wsl.wslConf.automount.ldconfig`, doesn't help here. Its own option description says it "does not work with NixOS and `wsl.useWindowsDriver` should be used instead".
### Docker without Docker Desktop
Docker Desktop needs a [paid subscription](https://docs.docker.com/subscription/desktop-license/) for professional use in organizations with 250 or more employees or $10 million or more in annual revenue. Inside NixOS-WSL you can use the standard NixOS module instead. The project removed its old `wsl.docker-native` option with the message "Additional workarounds are no longer required for Docker to work":
```nix
virtualisation.docker.enable = true;
virtualisation.docker.autoPrune.enable = true; # weekly `docker system prune -f`; volumes are kept
users.users.nixos.extraGroups = [ "docker" ];
```
`enableOnBoot` already defaults to `true`. Group membership only applies to new sessions, so run `wsl -t NixOS` before the first `docker run`. If you'd rather keep Docker Desktop, `wsl.docker-desktop.enable = true` sets up its integration (the `docker` group, and the helper binaries it expects).
### VS Code Remote needs nix-ld
The VS Code server downloads a generic Linux Node.js binary, which expects `/lib64/ld-linux-x86-64.so.2`. That file doesn't exist on NixOS. The [project's VS Code how-to](https://nix-community.github.io/NixOS-WSL/how-to/vscode.html) gives two fixes. The more robust one:
```nix
programs.nix-ld.enable = true;
environment.systemPackages = [ pkgs.wget ]; # the how-to requires it for both fixes
```
nix-ld already ships a default library set that includes `zlib`, `openssl`, `curl` and the C++ runtime. Add to `programs.nix-ld.libraries` only when a binary still reports a missing `.so`. The module sets `NIX_LD` as a session variable, so restart the distro with `wsl -t NixOS`, then reconnect VS Code.
## `/etc/wsl.conf` changes need a distro restart
Because `/etc/wsl.conf` is generated, edit `wsl.wslConf.*` in `configuration.nix`, never the file itself. A rebuild overwrites the file. WSL also only reads it at startup ([Microsoft's docs](https://learn.microsoft.com/en-us/windows/wsl/wsl-config) have you restart with `wsl --shutdown` after editing it). So after any `nixos-rebuild switch` that touches `wsl.wslConf`, run:
```powershell
wsl -t NixOS # this distro only
wsl --shutdown # all distros, if -t isn't enough
```
The troubleshooting docs note that "some issues will only be resolved after a _full_ restart of WSL".
## Troubleshooting
### Rollback without a boot menu
WSL boots its own kernel, so NixOS-WSL turns off the bootloader (`loader.grub.enable = false`, and `installBootLoader` is `true`, a no-op). The "pick an older generation from the boot menu" escape from the first-steps entry doesn't exist here. While the distro still starts, roll back from inside:
```sh
sudo nixos-rebuild switch --rollback
ls -l /nix/var/nix/profiles/system-*-link # the generations you can go back to
```
When it doesn't start, use the recovery shell.
### Recovery shell
If a bad generation leaves the distro unusable, this bypasses your system's normal startup:
```powershell
wsl -d NixOS --system --user root -- /mnt/wslg/distro/bin/nixos-wsl-recovery
```
Per the [recovery docs](https://nix-community.github.io/NixOS-WSL/troubleshooting/recovery-shell.html), it loads WSL's system distro, activates your configuration and chroots into it, "similar to what `nixos-enter` would do". To boot into an older generation, add `--system /nix/var/nix/profiles/system-42-link`. That path is relative to the NixOS root.
### Networking: WSL owns `/etc/hosts` and `resolv.conf`
`wsl.wslConf.network.generateHosts` and `generateResolvConf` both default to `true`, so WSL writes both files at startup.
For `/etc/hosts`, NixOS-WSL then disables NixOS's own copy (`hosts.enable = false` in the module). NixOS builds that file from `networking.hosts` and `networking.extraHosts`, so both are silently ignored.
For `resolv.conf`, WSL and NixOS's resolvconf service can both end up writing it. If you want `networking.nameservers` to be the only source, turn WSL's generation off:
```nix
wsl.wslConf.network.generateHosts = false; # networking.extraHosts works again
wsl.wslConf.network.generateResolvConf = false; # NixOS alone manages resolv.conf
networking.nameservers = [ "1.1.1.1" ];
```
Rebuild, then restart the distro, as with any other `wsl.wslConf` change. The WSL hostname follows `networking.hostName` by default, through `wsl.wslConf.network.hostname`.
### File permissions on `/mnt/c`
Windows drives are mounted with `metadata,uid=1000,gid=100` by default (`wsl.wslConf.automount.options`). Microsoft's docs describe `metadata` as adding metadata "to Windows files to support Linux system permissions". So `chmod` on `/mnt/c` files works and persists. Everything also appears owned by UID 1000, the default `nixos` user. If your user has a different UID, change the mount options to match.
### Renaming the default user
Set `wsl.defaultUser`, then follow the [documented order](https://nix-community.github.io/NixOS-WSL/how-to/change-username.html) exactly. Use `nixos-rebuild boot`, not `switch`, which the docs say "may lead to the new user account being misconfigured". Then run `wsl -t NixOS`, `wsl -d NixOS --user root exit`, and `wsl -t NixOS` again, and open a new shell.
## Further reading
Stéphane Robert's [NixOS dans WSL : environnement complet](https://blog.stephane-robert.info/docs/securiser/os-immuable/nixos/installation-wsl/) (in French) builds the same setup into a full workstation: a flake repository split into `hosts/` and `modules/`, Docker, Zsh with Oh My Zsh, and nix-ld for VS Code. The Docker, VS Code and "keep the configuration in Git" sections above follow its outline, checked against the NixOS-WSL and nixpkgs sources. Its Zsh part has [its own entry](zsh-oh-my-zsh-declarative.md).